 |
|
|
|
|
|
|
|
| Restoration Success Stories from Other Tonka Enthusiasts | |
|
Bills Story; I got my initiation into the wide world of Tonka's when I decided, 10 years ago, to try and find a particular Tonka jeep/wrecker/plow model. You know the one; the '65 white jeep with the beacon light and AA sticker on the back and the black windshield frame. I remember quite well how it met it's demise on a gravel road, tied behind a bicycle with a string. When I got it home, it looked like it had been through a rock crusher with all the paint nearly gone. A shapeless mass of grey metal. Anyway, someone suggested I take a look on eBay and that Tonka was one of the more popular sites. I went there and was instantly agog with all the toys! Not only Tonka's but many other brand names I had heard of and played with as a kid but. I didn't have as large a budget to work with at the time so, the first jeep I won was a disappointment because it turned out to be a mini. It actually looked like the full sized in the picture and I hadn't thought to ask for dimensions. None were listed either. Well, as the months went by, after about a year I had amassed quite a menagerie of jeeps but couldn't seem to reach my goal of the wrecker. Then one day I found the one! It was quite beat and rusty but it had a plow but that was about it. Shortly after that I found the other one I needed; a 1965 that had the tow tower and beacon light but no plow. I couldn't wait to marry the two in "Holy Matrimony" as the choir sang Hallelujah from Handel's Messiah (in my head). It was then that I began to make a most important discovery about Tonka jeeps of the '60's which is; they can all be identified from year to year. After doing some deep research, it was then I wrote my eBay Guide: "Identifying Pre-'70's Tonka Jeeps" which you can find on my auction sites or my about ME page. _small.jpg) _small.jpg) Before and After shots of Bills amazing work! I wish Tonka Had put a clear coat on over the decals to protect them. The 1955 Gambles restoration was one of my favorites and actually, one of my best. I wanted to branch out into the older and higher priced world of Tonka restoration and this truck was my first step into that world. I was actually looking for a truck and trailer combo to start with when I ran across this one. I thought it was the 1964 red pickup. No one seemed to be interested and I was quite surprised how reasonable it was. It was actually lower than some of the jeeps I had bought. This was also the first restoration that I would document and a very gratifying bond with my new hobby was fully formed. One that would also get me into trouble with my wife many times! When this little red orphan appeared at my door, it was quite a sight! It looked like it was painted with a brush and roller, then buried in the ground before the paint got a chance to cure. I started this restoration by washing it with dish soap and water. Then I begin by applying a liberal coating of aircraft stripper. I have big blowers in the shop that force fresh air in and then a bit smaller to carry fumes out. With this set-up it creates a positive pressure inside to keep dust out for when I paint. I do the paint stripping right next to the exit blowers and wear a mask. Sometimes you have to do the process twice. When I got the first coat of paint and dirt off, what I found underneath was a pleasant surprise; this wasn't your average little red Tonka. I saw white paint and the faint green rectangle on each door that only could indicate one thing. This was one of the rarer Gambles labeled trucks that Tonka did for Gambles stores as a promotional!. I finish stripping the paint and then bead-blast to "etch" the surface of the metal to create a surface that will grab hold of the primer and won't let go. It is the same process I use when doing full size auto restoration and custom work, which is what I do for a living. I then use an automotive sandable, build-up primer and sand with 400 grit between coats. I usually end up putting 3 to 5 coats of this primer on and it is amazing how this will actually even fill small dings and pits. After the first coat of primer if there are any dents I couldn't bang out with a hammer, I use an automotive product called glazing putty which can be found at your nearby auto supply house. It is a quick-drying, easily sandable filler. After the final build-up primer, I then use one thin coat of primer sealer. I leave this over night to dry and then I begin applying a base coat color with an air-brush. I find you have more control with an air-brush than spray-bombs will give you. You don't have to work so fast and worry about runs. You can actually take your time and really look things over as you paint. One important thing I should mention here is that you should have PLENTY of light! I have halogen lighting pointing from every corner and an 8-foot, double bulb florescent directly above my work bench. After the base coats (usually 2) have dried over night, I use a catalyst automotive clear coat and apply two coats. I let this dry for about 4 hours and put the decals on at this point and bury them with another couple coats and leave those to dry over night. I then sand with 400 grit and apply 2 more coats and let dry overnight and put a final 2 coats on the next day after I have really detail sanded the whole thing, working to smooth out all surfaces perfectly and after the final coats have dried for about 3 days, I buff out all the parts by hand with a carnuba based clearcoat sealer for a mirror-like finish which also protects the clear from light dings and scratches by allowing the surface to slip instead of grab. Any color matching is done at our local NAPA auto parts store. Never choose colors with glitter and always use natural light to make comparisons. For any restoration parts I may need, I turn to Tonka Toy Man or Chief Tonka for new parts. For used parts, usually Tonka Salvage Yard. There are quite a few more but Kevin and Jen have been very good to me. My thanks goes out to Tonka Toy Man for his restoration tips. Many thanks to Richard at ToyDecals.com. He supplies ALL the high quality decals that Tonka would be very proud of! Thanks to my dear, patient and understanding wife who didn't choose divorce after the new carpet was installed in the living room! Finally, I'd like to thank my many customers who bought F100's CLASSICS in the past. It is your kind generosity that has kept my little ship afloat during these tumultuous economic times! Thanks Ray! I will run into you now and again on eBay, I'm quite sure! Bill ~F100's CLASSICS~ f100's (On eBay) |
|
|
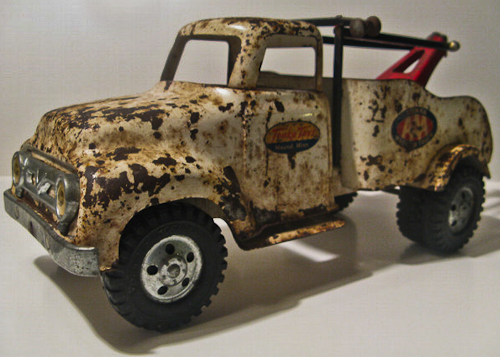
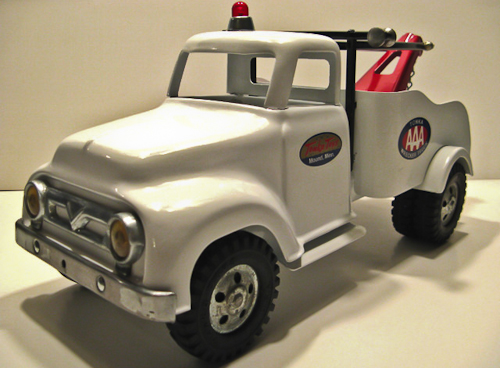
Jeffs Restoration Story; This is a 1956 Tonka AAA Wrecker. When I bought it from ebay...my thoughts were to change it from what it was to a 1957 cab in hopes to make it the 1957. I have to tell you all, I am relatively new to the Tonka world. I got started from watching my best friend Roger refurbishing Tonka's. He is the master in my books. I wanted to try my hand at Tonka's but figured the whole rivet removal thing was impossible for a novice like me. So I bought Buddy L Coke trucks ( I have all the years now), and got a bit bored with yellow paint.
When ever I do a truck...I first take it completely apart. Then it all gets a bath (with exception of the chrome) in Muriatic Acid, I think its a 10-20% mixture and gets better with age. This sets for a couple of days till all paint is falling off. Note to those who haven't used Muriatic Acid...don't get it on the garage floor your wife will get mad at you. Once you pull it from the acid wash, it gets hosed of with tap water. Then dry it fast with a hair dryer, this prevents a thin layer of rust which appears if you let it dry. At this point its off to the bead blaster, every nook and cranny is shot. Then dusted or blown off with an air gun.
After all is sanded to a mirror finish, I use Dupli-Color paints....working fast and with the can less than a foot from the surface, five to ten minutes between coats (no runs hopefully). Then all pieces are placed in front of or under a 75 watt heat lamp.
I have found leaving your work for a few days helps the paint to set up
almost rock hard. Less chance of chipping when you reassemble your work. |
|
|
The back doors open to load whatever precious cargo a child's imagination could dream up and fit through the ramp/doorway. |
|
| If you would like your restoration projects shown on this website, please send me an email. - Ray | |
|
|
|
| Do you have Tonka Toys to sell? Please Contact me at Micah@tonkatoys.com | |
|
|
|

